Several aspiring devs struggle with picking a programming language for their career. But what if you could create your own programming language?
In college, I saw so many languages, and I thought I would build one! Inspired by Java, I started creating Zava. I only got halfway before life took over, but it taught me much about language creation. If you’re not like me, you’ll finish writing your language and become the next James Gosling!
Stories aside, custom programming languages are like superheroes! They swoop to solve specific problems, turbocharge performance, and simplify complex tasks. Whether building a game, analyzing data, or controlling a robot, a tailored language can make everything smoother and more fun.
Creating your own language is like a grand adventure! Here’s what you’ll do:
- Dream up your language’s purpose.
- Design its look and feel.
- Build the engine (lexer, parser, compiler).
- Create the world (runtime environment).
- Test and perfect your creation.
Ready to build your own language? Let’s go!
What are the steps to create a programming language?
Creating a new programming language involves several high-level steps, each essential to developing a functional and efficient language.
Define the grammar
Start by defining the grammar of your language, which outlines the syntactical rules that must be followed. This formal grammar dictates how programs are written, ensuring consistency and correctness.
Think of it like defining rules for a sentence in a human language; for example, an assignment statement might be defined as “a variable name, an equal sign, and a value.”
Example:
Assignment -> VariableName "=" Number
This rule specifies that an assignment must consist of a variable name followed by an equal sign and a number.
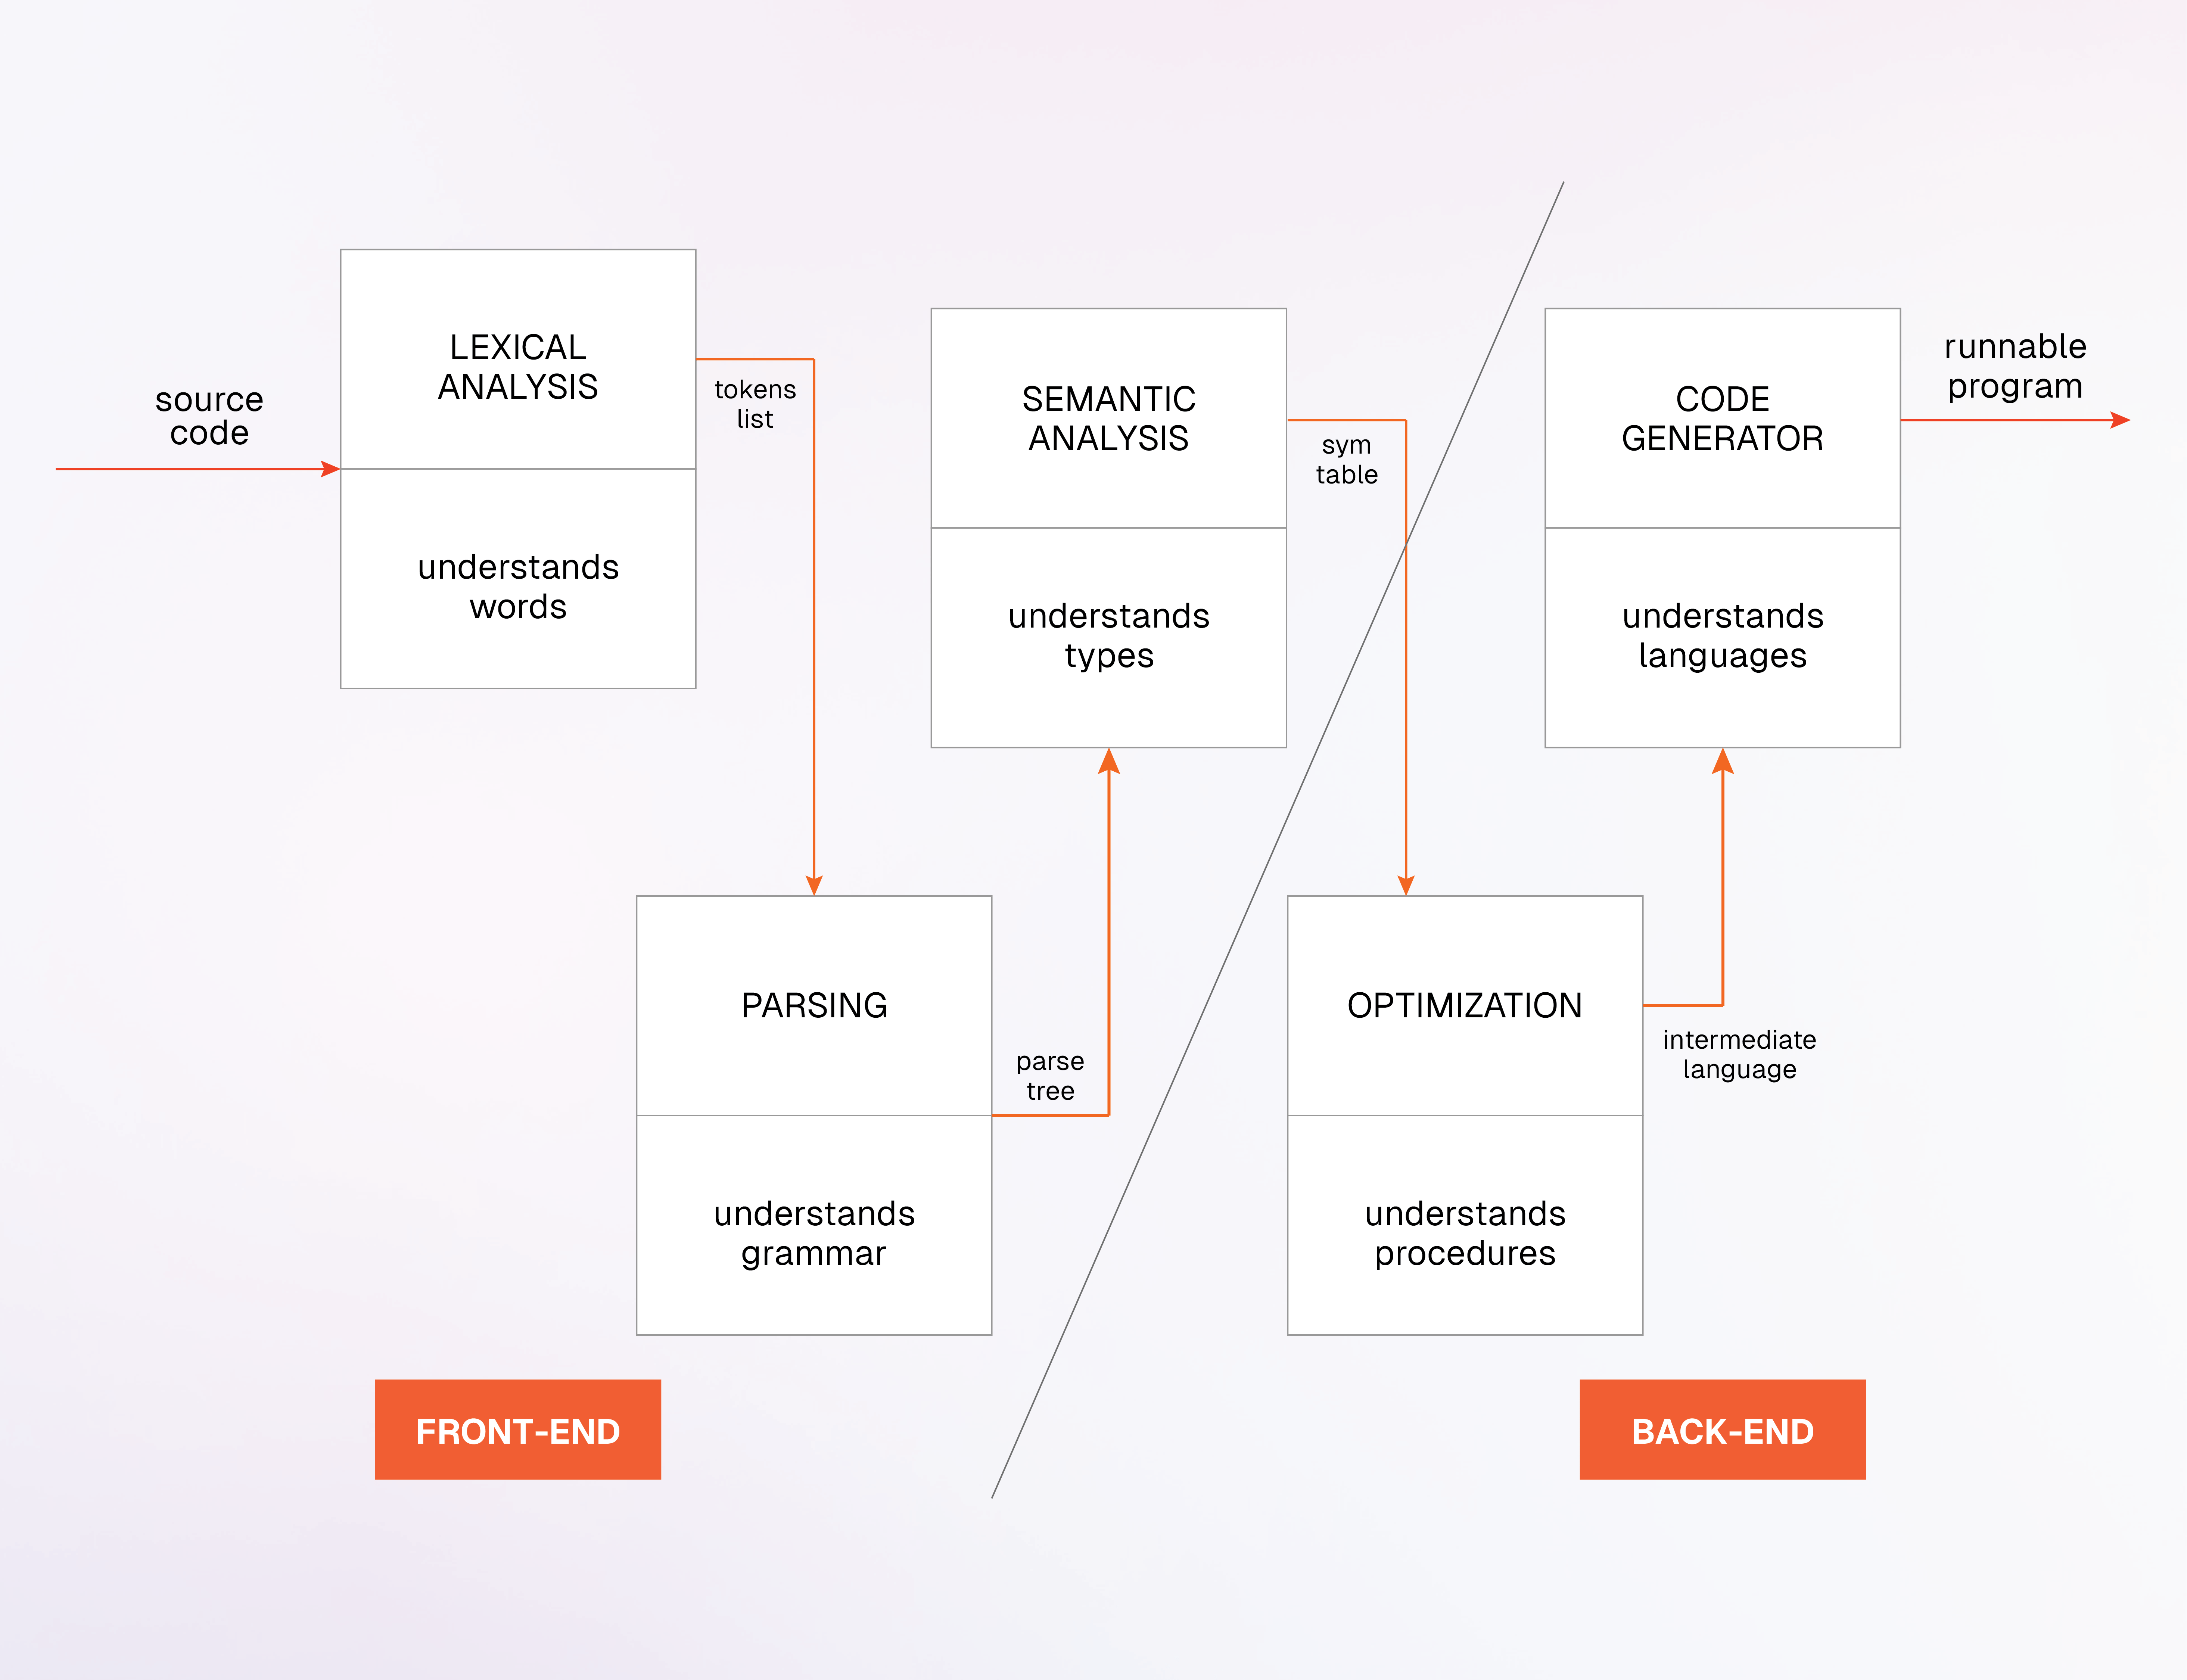
Build the front-end compiler
The front-end compiler processes the source code and produces an intermediate representation (IR), often a tree-like data structure known as the Abstract Syntax Tree (AST). This step includes:
- Lexical analysis: Tokenizing the source code into keywords, operators, and other meaningful symbols.
- Parsing: Organizing tokens into an AST, which represents the hierarchical structure of the code.
- Semantic analysis: Checking for semantic errors and ensuring the code makes logical sense.
Example:
Source Code: x = 5 + 3;
Tokens: [VariableName(x), Equal(=), Number(5), Plus(+), Number(3), Semicolon(;)]
AST: Assignment(VariableName(x), Addition(Number(5), Number(3)))
Build the back-end code generator
The back-end code generator translates the IR into target machine code or another high-level language. This involves:
- Optimization: Improving the IR for performance, such as reducing memory usage or enhancing execution speed.
- Code generation: Converting the optimized IR into machine code or another language like C, which can then be compiled further.
Example:
Optimized IR: x = 8;
Target Code (C): int x = 8;
Defining the purpose and goal of your coding language
To define the purpose and goal of your language, two aspects are most important: Identify the problem your language will solve and who you built it for.
Defining the problem your language will solve
Creating a new programming language is like making your own game rules. You can fix problems or add cool features other languages don’t have. Identifying the main issue your language will tackle is critical because it shapes everything you do next.
Maybe you want to make a super-fast language for games, a simple one for teaching, or a secure one for sensitive data. Here are some issues you can solve with your language:
- Performance issues: Optimizing for specific hardware or real-time applications.
- Educational simplicity: Providing a simpler syntax and clearer semantics for learning and teaching.
- Domain-specific needs: Tailoring features for specific fields like data science, artificial intelligence, or web development.
- Concurrency & parallelism: Offering better abstractions and tools for concurrent and parallel programming.
- Security enhancements: Building in features that help prevent common security vulnerabilities.
- Cross-platform compatibility: Ensuring smooth operation across different operating systems and devices.
- Error handling and debugging: Improving error messages, debugging tools, and overall developer experience.
- Memory management: Providing better or more intuitive memory management features like garbage collection.
- Interoperability: Ensuring smooth integration with other languages and systems.
- Customization and flexibility: Allowing for more customization options for specialized needs.
Determining the target audience
Knowing who will use your language is crucial. Your audience could be beginners, teachers, data scientists, or system programmers. This helps you decide on the complexity, features, and usability.
For example, a language for beginners should be easy to learn with clear error messages, while a language for experts might prioritize performance and flexibility.
Here is a list of potential target audiences:
- Novice programmers: People new to programming who need an intuitive, easy-to-learn language.
- Educators: Teachers and professors who require a language with clear syntax for instructional purposes.
- Data scientists: Professionals focused on data analysis and machine learning.
- System programmers: Developers working on system-level programming, requiring performance and low-level access.
- Web developers: Programmers specializing in building and maintaining web applications.
- Embedded systems engineers: Developers working on hardware-level programming and IoT devices.
- Game developers: Programmers designing and creating video games who need specialized libraries and performance optimization.
- Scientific researchers: Researchers need robust tools for simulations and computational tasks.
- Financial analysts: Professionals working on economic modeling and algorithmic trading.
- AI & ML engineers: Experts developing artificial intelligence and machine learning applications.
- Hobbyists & makers: Individuals creating projects for personal interest or prototyping.
So, who’s your personalized language for?
Influences and inspirations from popular languages
Drawing inspiration from existing languages can help in shaping your language’s design. Analyze the strengths and weaknesses of languages you admire or frequently use.
For example, Python’s readability, Lisp’s macros, or JavaScript’s ubiquity can serve as inspirations. Understanding these aspects can help you incorporate successful features while avoiding known pitfalls.
Here are a few more inspirations from popular coding languages:
- Ruby offers elegant and intuitive syntax.
- C provides performance and low-level control, and Java brings robustness and portability.
- Swift’s modern features and safety.
- Rust’s memory safety and concurrency.
- Go’s simplicity and efficiency in concurrent programming.
- Haskell’s robust type system and functional programming paradigms.
Language design for your programming language
Designing a language involves deciding how it will look and behave, like building your game and deciding whether it’s a card game, a board game, or more like chess pieces.
Key design principles: simplicity, clarity, user-friendliness
When designing your language, keep it simple, clear, and user-friendly.
- Simplicity: Keep it straightforward to facilitate learning and maintenance. Focus on essential features that solve your target problem without unnecessary complexity.
- Clarity: Make the syntax and semantics clear to avoid confusion and errors. Use unambiguous rules and provide thorough documentation.
- User-friendliness: Ensure a great user experience from coding to debugging. To boost user satisfaction, include intuitive error messages, useful debugging tools, and a comprehensive standard library.
Syntax and semantics
When designing the syntax of a programming language, you need to decide on
- keywords,
- operators, and
- structure.
For instance, Python uses indentation to define code blocks, creating a clean and readable layout. In contrast, C uses braces {} to define code blocks, offering a different level of control and organization.
Semantic rules determine how your language handles variable types, scope, and control flow. For example, Java is statically typed, meaning variable types are checked simultaneously, reducing runtime errors.
When I created ZAVA, I based it on Java to combine familiarity with fun new features. Here’s how ZAVA looks:
- Syntax: Similar to Java, but with some twists for simplicity and fun.
- Keywords: Uses fun for functions and let for variable declarations.
- Operators: Standard operators like +, -, *, / and = for assignments.
Here’s a sample Hello World program in ZAVA:
fun main() {
    show Hello, World!
}
Here are a few takeaways from the Hello World program:
- For print functions, I’ve used the keyword show
- In ZAVA, you don’t need to use ” ” for strings.
- ZAVA uses curly braces since I believe in being organized even while having fun.
I’m sure you can develop something better and a language that makes more sense than ZAVA.
Building the lexer for your coding language
Creating a lexer involves breaking the source code into manageable pieces, like setting up game levels.
Lexical analysis
Lexical analysis is the first phase of a compiler, where the source code is scanned and converted into tokens. Tokens are the smallest units of meaning, such as keywords, identifiers, literals, and operators.
Tokenizing the input code
This is like dividing a game level into distinct objects such as characters, obstacles, and power-ups. Each element, such as identifiers, keywords, and literals, is identified and separated.
For instance, in a code snippet, let score = 100; let is a keyword, score is an identifier, and 100 is a literal.
Handling different token types
As each game object has a specific role, each token type (like variable names, reserved words, and constants) is recognized and categorized to understand its function in the code.
How to perform lexical analysis?
- Read the source code: The lexer reads the source code character by character.
- Identify tokens: It groups characters into meaningful sequences (tokens) based on predefined rules.
- Categorize tokens: Each token is categorized (e.g., keyword, identifier, literal).
- Output token stream: The lexer produces a stream of tokens for the parser to process.
Consider the code let x = 10;. The lexer processes this as follows:
let→ Keywordx→ Identifier=→ Operator10→ Literal;→ Delimiter
Using tools for lexical analysis
Using tools like Lex and ANTLR can greatly simplify building a lexer. They can make it more manageable and efficient, allowing you to focus on your programming language’s higher-level design and functionality.
Lex
Lex is a tool used to generate lexical analyzers. Here’s how it works:
- Define tokens: Write rules to identify tokens in a Lex file.
- Generate lexer: Lex converts the rules into a C program that functions as a lexer.
- Compile and use: Compile the generated C program and integrate it with the rest of your compiler.
Example with Lex
%{
#include "y.tab.h"
%}
%%
[0-9]+    { yylval = atoi(yytext); return NUMBER; }
[a-zA-Z]+ { return IDENTIFIER; }
[ \t\n]+  { /* Ignore whitespace */ }
.         { return yytext[0]; }
%%
This example shows how Lex rules can define numbers, identifiers, and whitespace patterns.
ANTLR
ANTLR (Another Tool for Language Recognition) is a powerful tool for generating lexers and parsers. Here’s the process:
- Write grammar: Define the language grammar in an ANTLR file.
- Generate code: ANTLR generates the lexer and parser code in your chosen language (e.g., Java, Python).
- Integrate: Use the generated code in your project to tokenize and parse input.
Example with ANTLR
In this example, ANTLR defines rules for numbers, identifiers, and whitespace, similar to the Lex example.
lexer grammar MyLexer;
NUMBER: [0-9]+;
IDENTIFIER: [a-zA-Z]+;
WHITESPACE: [ \t\n]+ -> skip;
Parsing
Parsing is like organizing game elements into a cohesive level, turning the raw components into a playable stage.
Parser design
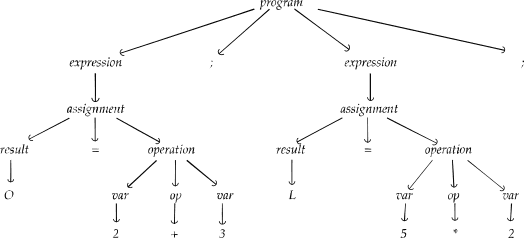
Creating a parser involves converting the token stream into a structured format called the abstract syntax tree (AST). This tree represents the hierarchical structure of the source code.
How to create a parser?
- Define grammar rules: Determine how different parts of the language relate, like how game rules define interactions.
- Process tokens: Read the token stream and apply the grammar rules.
- Build nodes: Create a node in the AST for each construct (like expressions or statements).
- Connect nodes: Link the nodes according to the hierarchy defined by the grammar.
Example: For the expression a + b * c, you would:
- Identify
a, +, b, *,andcas tokens. - Create nodes for each element.
Connect the nodes to reflect the correct order of operations:
  +
 / \
a   *
   / \
  b   c
Building the abstract syntax tree (AST)
The AST is a tree representation of the code’s structure, where each node represents a construct in the language (like expressions, statements, or declarations).
How to build AST?
- Initialize the root node: Start with the main construct, such as a function or expression.
- Add child nodes: Add child nodes for each part of the main construct. For example, if the root node is an addition operation, its children would be the operands.
- Traverse the tokens: Move through the token stream, applying grammar rules to determine where each token fits in the tree.
- Recursively build subtrees: Recursively create subtrees for complex constructs like nested expressions.
Example: Parsing let x = 3 + 4 would create an AST like this:
| = / \ let + / \ 3 4 |
In this example:
letis the keyword to start a declaration.=is the assignment operator.+is the addition operator, with 3 and 4 as its operands.
Parser generators
Parser generators like Yacc and Bison are tools that automatically generate a parser from a given grammar.
These tools convert a formal grammar definition into source code for a parser. This parser can then analyze and interpret the structure of the input code according to the defined grammar.
Here’s how you can use parser generators
- Define the grammar: Write the grammar rules in a specific format.
- Run the tool: Use Yacc or Bison to process the grammar file and generate parser code.
- Integrate: Compile the generated parser code and use it in your project.
Example with Yacc
%{
#include "y.tab.h"
%}
%%
expr: term '+' expr { $$ = $1 + $3; }
    | term { $$ = $1; }
    ;
term: factor '*' term { $$ = $1 * $3; }
    | factor { $$ = $1; }
    ;
factor: NUMBER { $$ = $1; }
      ;
%%
int main() {
    yyparse();
    return 0;
}
Example with Bison
%{
#include <stdio.h>
%}
%%
expr: term '+' expr { printf("%d\n", $1 + $3); }
    | term { printf("%d\n", $1); }
    ;
term: factor '*' term { printf("%d\n", $1 * $3); }
    | factor { printf("%d\n", $1); }
    ;
factor: NUMBER { printf("%d\n", $1); }
      ;
%%
int main() {
    yyparse();
    return 0;
}
Semantic analysis for your language
Semantic analysis ensures that a program’s elements are used correctly according to the rules of the language, verifying the program’s logic and meaning.
Semantic analysis in programming is like ensuring game rules are followed during gameplay, ensuring every move is valid and makes sense.
Contextual Analysis
Contextual analysis ensures that the program’s elements (variables, functions, etc.) are used correctly according to the language’s rules. It checks for consistency and correctness beyond syntax, ensuring the code makes logical sense.
Type checking
Type checking ensures that operations use compatible data types, preventing type errors that can cause runtime issues.
For example, in TypeScript, if you declare let x: number = "hello"; the type checker will flag an error because x is expected to be a number, not a string. This helps catch errors early and keeps the code reliable and easy to maintain
Scope Management
Scope management tracks the visibility of variables and functions within different parts of the program. It involves maintaining a symbol table that records each variable’s scope, ensuring they are only accessible within their intended context.
For instance, in JavaScript, variables declared with let or const inside a block are not accessible outside of that block:
if (true) {
  let blockVariable = "I'm in block scope";
}
console.log(blockVariable); // Error: blockVariable is not defined
Error Handling
Error handling is a crucial part of programming. It ensures that your code can gracefully handle unexpected issues without crashing. It involves detecting, reporting, and recovering from errors to maintain smooth program execution.
Reporting errors
Semantic errors are logical mistakes when the program’s behavior doesn’t match the developer’s intention, even though the code is syntactically correct. Examples include using an undeclared variable, performing operations on incompatible types, or accessing non-existent dictionary keys. Effective error reporting involves:
- Descriptive error messages
Clearly explain the nature of the error and where it occurred. For instance, in Python, if you try to add a string to an integer, you’ll get a TypeError with a message indicating the operation’s incompatibility.
x = "5"
y = 10
result = x + y  # TypeError: can only concatenate str (not "int") to str
To fix it, convert the string to an integer:
result = int(x) + y
- Highlighting error lines
Pinpoint the exact location in the code where the error occurred. This helps developers quickly identify and address the issue.
Recovering from errors
Once an error is detected, the program should handle it without crashing. This is typically done using error-handling constructs like try, except, and finally in Python:
- Try and Except blocks
Enclose code that might raise an error within a try block and handle potential errors in the except block.
try:
    result = int(input("Enter a number: ")) / int(input("Enter another number: "))
except ZeroDivisionError:
    print("You can't divide by zero!")
except ValueError:
    print("Please enter valid numbers!")
- Else and Finally blocks
Use the else block to execute code if no errors occur and the finally block to run code regardless of whether an error occurred, ensuring necessary cleanup actions.
try:
    result = int(input("Enter a number: ")) / int(input("Enter another number: "))
except ZeroDivisionError:
    print("You can't divide by zero!")
except ValueError:
    print("Please enter valid numbers!")
else:
    print(f"The result is {result}")
finally:
    print("End of error handling example.")
Intermediate representation
Intermediate Representation (IR) is a crucial step in the compilation process that bridges the high-level source and low-level machine codes.
It abstracts the details of the underlying hardware and provides a platform-independent way to optimize and generate executable code.
Generating IR
Generating IR involves translating the Abstract Syntax Tree (AST) into a more manageable, linear form that can be easily manipulated and optimized. This process takes the structured tree representation of the source code and converts it into a sequence of instructions.
Example: If the AST represents an arithmetic expression like a + b * c, the IR might translate this into a series of instructions:
t1 = b * c
t2 = a + t1
Here, t1 and t2 are temporary variables used to hold intermediate results.
Translating AST to IR
The translation process from AST to IR involves traversing the AST and generating corresponding IR instructions for each node. This typically involves:
- Traversing the AST: Visit each node in the AST.
- Generating instructions: For each node, generate the appropriate IR instruction.
- Handling temporary variables: Use temporary variables to store intermediate results as needed.
Example:
def translate_to_ir(node):
    if node is an addition:
        left = translate_to_ir(node.left)
        right = translate_to_ir(node.right)
        return f"{left} + {right}"
    elif node is a multiplication:
        left = translate_to_ir(node.left)
        right = translate_to_ir(node.right)
        return f"{left} * {right}"
    # Handle other node types...
Benefits of IR in Optimization
IR is beneficial for optimization because it simplifies the code and makes it easier to apply various optimization techniques. Some benefits include:
- Platform independence: IR abstracts away the details of the underlying hardware, allowing optimizations to be applied uniformly across different platforms.
- Simplified analysis: The linear form of IR makes it easier to analyze and manipulate the code for optimization purposes.
- Flexibility: IR can be used as a common intermediate step for multiple source languages, making it a versatile tool in the compilation pipeline.
Basic optimizations techniques
- Constant folding: Simplifies constant expressions at compile time. For example, replacing
3 + 4with7. - Dead code elimination: This process removes code that does not affect the program’s output, such as unused variables or unreachable code.
Example of Constant Folding:
Original: x = 2 * 3 + 4
Optimized: x = 6 + 4
          x = 10
Example of Dead Code Elimination:
Original:
x = 10
y = 20
print(x)

Optimized:
x = 10
print(x)
This example, y = 20 is removed because y is never used.
Code generation
Code generation is the final step in the compilation process, where the intermediate representation (IR) is translated into target machine code. This step involves converting the optimized IR into instructions that can be executed by a specific hardware architecture.
Let’s take the game creation example again. You start with a rough draft (IR) of how the game will work. The final step is creating the actual game pieces and board (target machine code) that players can interact with. Just as you translate the game rules and designs into physical components, the compiler translates IR into machine code that the computer can execute.
Target code
Target code is the machine code or assembly language specific to the processor architecture on which the program will run. This code directly interacts with the hardware and is essential for the program’s execution.
Example: For an addition operation in IR:
t2 = a + t1
The target code for an x86 architecture might look like:
MOV EAX, a
ADD EAX, t1
Translating IR to Target Machine Code
Translating IR to target machine code involves several steps:
- Instruction selection: Choose the appropriate machine instructions for each IR operation.
- Register allocation: Assign variables to physical registers or memory locations.
- Instruction scheduling: Order the instructions to optimize performance and avoid pipeline stalls.
Here’s an example:
t1 = b * c
t2 = a + t1
For ARM architecture, this might translate to:
MUL R1, R2, R3  ; t1 = b * c
ADD R0, R0, R1  ; t2 = a + t1
Handling Different Architectures
Different architectures like x86 and ARM have unique instruction sets and operational characteristics. Code generation must account for these differences to produce efficient machine code.
- x86: A complex instruction set computer (CISC) architecture known for its rich instruction set and backward compatibility.
- ARM: A reduced instruction set computer (RISC) architecture focusing on power efficiency and simplicity.
Example: For a simple addition, the code for x86 and ARM might look different:
x86:
MOV EAX, a
ADD EAX, b
ARM:
LDR R0, =a
ADD R0, R0, b
Using LLVM
LLVM (Low-Level Virtual Machine) is a robust framework for developing compiler backends. It provides a suite of modular and reusable compiler and toolchain technologies.
Benefits of LLVM for code generation:
- Modularity: LLVM’s modular design allows for easy integration and extension of its components.
- Optimization: LLVM provides a wide range of optimization passes that can significantly improve the performance of the generated code.
- Portability: LLVM’s intermediate representation can be easily translated to multiple target architectures, making it highly portable.
- Community and support: A large and active community supports LLVM, providing extensive resources and continual improvements.
Example of Using LLVM: To generate machine code with LLVM, you typically:
- Generate LLVM IR: Convert your source code to LLVM’s IR.
- Optimize IR: Apply LLVM’s optimization passes.
- Generate target code: Use LLVM’s code generator to produce machine code for the desired architecture.
Here’s an example workflow
Generating LLVM IR:
define i32 @main() {
entry:
  %a = alloca i32, align 4
  %b = alloca i32, align 4
  %0 = load i32, i32* %a, align 4
  %1 = load i32, i32* %b, align 4
  %add = add nsw i32 %0, %1
  ret i32 %add
}
- Optimizing IR: Apply optimization passes like constant folding or dead code elimination.
- Generating target code: Use LLVM’s code generation tools to produce the final executable.
Runtime environment for your coding language
Creating a programming language involves defining its syntax and semantics and setting up a runtime environment where the language will execute. The runtime environment includes the infrastructure that supports the execution of your programs, managing resources such as memory and processor time.
Execution models: Interpreted vs. compiled languages
Interpreted languages
These languages are executed line-by-line by an interpreter. This model allows for more flexibility and platform independence but can be slower than compiled languages.
Examples include Python and JavaScript. Imagine having a recipe book where a chef reads and executes each step as you cook, adjusting on the fly if needed. This method is highly adaptable but can be less efficient.
Compiled languages
A compiler translates These languages into machine code before execution. This process typically results in faster and more efficient execution since the entire program is converted into machine code simultaneously.
Think of this as having your recipe fully translated and printed before cooking, ensuring you can follow it quickly without waiting for translations. Examples include C and Rust.
Memory management
Memory management is a critical aspect of a runtime environment, involving allocating, using, and releasing memory during a program’s execution. There are two main approaches to memory management:
Garbage collection
This automatic process reclaims memory occupied by objects no longer in use. It’s like having a cleaner who continuously sweeps away unused ingredients and tools from your cooking workspace, ensuring you always have space for what’s next. Java and JavaScript use garbage collection to handle memory automatically, reducing the risk of memory leaks and other errors.
Manual memory management
In languages like C and C++, programmers are responsible for allocating and freeing memory. This is akin to a chef meticulously managing their pantry, ensuring they only use what’s needed and put things back in their place. While this provides more control and can be more efficient, it also increases the risk of errors such as memory leaks and dangling pointers.
Using LLVM
LLVM (Low-Level Virtual Machine) is a powerful tool that supports the development of compilers for various programming languages. It offers a suite of modular and reusable compiler and toolchain technologies, making it easier to implement language-specific optimizations and generate efficient machine code.
Benefits of LLVM for Code Generation:
- Modularity: LLVM’s components can be reused and extended, allowing you to build custom tools tailored to your language’s needs.
- Optimization: LLVM provides numerous optimization passes, improving the performance of the generated code.
- Portability: By targeting LLVM IR (Intermediate Representation), your language can be easily compiled into different architectures without significant changes.
For example, translating the intermediate representation (IR) of your language to machine code using LLVM involves:
- Generating LLVM IR: Convert your language’s high-level constructs into LLVM’s intermediate representation.
- Optimizing IR: Apply LLVM’s built-in optimization passes to enhance performance.
- Code generation: Use LLVM to generate machine code for your target architecture, whether it’s x86, ARM, or another platform.
Building a standard library for your programming language
A standard library is a crucial part of any programming language, providing a collection of essential functions and utilities developers rely on to build applications. When designing your own language, creating a robust standard library can significantly enhance its usability and appeal.
Core Functions
Core functions form the backbone of your standard library. These are the essential utilities that every developer will need, ranging from basic data manipulation to input/output operations.
Think of core functions as the fundamental tools in a chef’s kitchen, like knives, pots, and pans—they’re indispensable for any recipe.
Examples of core functions
- String manipulation: Functions to handle common string operations, such as concatenation, splitting, and trimming.
fun concatenateStrings(str1, str2) {
    return str1 + str2;
}

let greeting = concatenateStrings("Hello, ", "World!");
- Mathematical operations: Basic arithmetic functions and more advanced mathematical utilities.
fun add(a, b) {
    return a + b;
}

let sum = add(5, 7);  // sum is 12
- File I/O: Functions to read from and write to files.
fun readFile(filename) {
    // Implementation to read file content
}

let content = readFile("example.txt");
- Data structures: Utilities for handling arrays, lists, maps, and other common data structures.
fun appendToList(list, element) {
    // Implementation to add element to list
}

let myList = [1, 2, 3];
appendToList(myList, 4);  // myList is now [1, 2, 3, 4]
Extensibility
Designing your standard library for extensibility ensures that it can grow and adapt as the needs of your language’s users evolve.
This involves creating a flexible architecture that allows developers to easily add new functions and utilities without disrupting existing functionality.
Tips for designing an extensible standard library
- Modular design: Break down the library into modules or packages, each responsible for a specific set of related functions. This makes it easier to manage and extend.
module math {
    fun add(a, b) { return a + b; }
    fun subtract(a, b) { return a - b; }
}

module string {
    fun concatenate(str1, str2) { return str1 + str2; }
    fun split(str, delimiter) { return // split logic; }
}
- Clear API: Define a clear and consistent API for interacting with the library. This helps ensure that new functions can be added in a way that feels natural to developers.
// Math module API
math.add(5, 3);
math.subtract(10, 4);

// String module API
string.concatenate("Hello", "World");
- Community contributions: Encourage community contributions. By allowing developers to propose and implement new features, your standard library can evolve more quickly and address a wider range of use cases.
// Example of a community-contributed function
module community {
    fun reverseString(str) {
        // Logic to reverse a string
    }
}

let reversed = community.reverseString("ZAVA");
Tooling and ecosystem for your programming language
Building a programming language is only part of the journey. You need a robust set of development tools and a supportive ecosystem to make it widely adopted and effective.
Development tools
To enhance the developer experience, powerful development tools like an Integrated Development Environment (IDE), debuggers, and profilers are essential. These tools help developers write, debug, and optimize their code efficiently.
Building an IDE
An IDE is a software application that provides comprehensive facilities to programmers for software development. Key features include code editing, syntax highlighting, code completion, and project management. Think of it as a high-tech kitchen with all the gadgets a chef needs to create culinary masterpieces.
Instead of creating an IDE, you can also request popular IDEs to add your language, like JDoodle.
Code editing
A powerful editor with syntax highlighting and code completion helps developers write code quickly and accurately.
// Example: The IDE suggests completing the function name
fun greet(name) {
    println("Hello, " + name)
}
Debuggers and profilers
Debuggers and profilers are essential tools for finding and fixing bugs and optimizing performance.
Debuggers
Debuggers allow developers to step through code, inspect variables, and set breakpoints to troubleshoot issues.
// Example: Setting a breakpoint
fun calculateSum(a, b) {
    return a + b; // Breakpoint here to inspect values of a and b
}
- Define test scenarios: Identify different scenarios to cover various parts of your language.
- Write test functions: Implement test functions to verify that each scenario works as expected.
- Automate tests: Use a framework to run these tests and check their results.
Example:
import unittest

class TestArithmeticOperations(unittest.TestCase):
    def test_addition(self):
        self.assertEqual(add(2, 3), 5)

    def test_multiplication(self):
        self.assertEqual(multiply(4, 5), 20)

if __name__ == '__main__':
    unittest.main()
Profilers help identify performance bottlenecks by analyzing which parts of the code consume the most resources.
// Example: Profiling function calls
fun intensiveTask() {
    // Profiler shows this function takes too long
}
Community and documentation for your coding language
Good documentation is crucial for helping developers understand how to use your language and its features. It serves as the instruction manual, guiding users through their journey with your language.
- User guides: Comprehensive guides explaining how to set up and use the language.
- API documentation: Detailed descriptions of all functions, modules, and classes available in the standard library.
- Tutorials and examples: Step-by-step tutorials and sample projects to help new users get started quickly.
A vibrant and supportive community can boost the adoption and growth of your language. Engaging with developers, encouraging contributions, and providing support are key components.
- Forums and chat groups: Create spaces where developers can ask questions, share knowledge, and collaborate on projects.
- Open source contributions: Encourage developers to contribute to the language’s development, improving and expanding its capabilities.
- Events and meetups: Organize or participate in events to promote the language and connect with users.
Here are some example initiatives you can take:
- Community forums: Set up forums where developers can discuss issues, share solutions, and collaborate.
- GitHub repositories: Host your language’s code and encourage contributions through pull requests.
- Online tutorials: Create and share video tutorials to help new users learn the basics of your language and its advanced features.
# Example of a README.md for GitHub
# MyLang

## Introduction
MyLang is a new programming language designed to be simple and fun.

## Installation
To install MyLang, download the latest release from our [GitHub Releases](https://github.com/myorg/mylang/releases) page.

## Contributing
We welcome contributions! Please read our [Contributing Guide](CONTRIBUTING.md) for more details.

## Community
Join our [forum](https://forum.mylang.com) and [Slack channel](https://mylang.slack.com)
Distribution and maintenance
Once you’ve developed your coding language, the next step is to package, distribute, and maintain it effectively. This ensures that users can easily access, use, and contribute to your language.
Packaging
Distributing Your Language Packaging your language involves bundling all necessary files and dependencies into a single package that users can easily download and install. This typically includes the language interpreter/compiler, standard libraries, and any additional tools.
Steps to package your language:
- Create a build script: Automate the process of compiling and packaging your language. Tools like Make for Unix-based systems or batch scripts for Windows can help.
- Include documentation: Ensure your package includes comprehensive documentation that helps users get started quickly.
- Use package managers: Consider distributing your language through popular package managers like npm for JavaScript, pip for Python, or cargo for Rust. This makes it easier for users to install and manage your language.
Example:
# Example Makefile for packaging a language
all: build package

build:
    gcc -o mylang mylang.c

package:
    tar -czvf mylang.tar.gz mylang mylang-docs/
Handling updates
Maintenance is an ongoing process that involves updating your language to fix bugs, add new features, and respond to community feedback. Here’s how you can manage it effectively:
- Version control: Use a version control system like Git to manage changes to your language’s codebase. This allows you to track modifications, collaborate with other developers, and roll back changes if needed.
- Release management: Plan and manage releases to introduce new features and fixes. Use semantic versioning (e.g., 1.0.0) to communicate changes clearly to users.
- Automated testing: Implement automated test suites to ensure that new changes do not introduce regressions. Continuous integration (CI) tools can run these tests whenever code is committed.
Example:
# Automate testing with a Makefile
test:
    ./run-tests.sh

release:
    git tag -a v1.0.0 -m "Release version 1.0.0"
    git push origin v1.0.0
Add your programming language to JDoodle
Creating a programming language is an exciting and challenging journey that involves designing syntax and semantics, building a lexer and parser, generating intermediate representation and machine code, managing runtime environments, and establishing a robust ecosystem of development tools and community support. Each step is crucial in ensuring your language is functional, efficient, and user-friendly.
JDoodle is an IDE supporting 88+ languages, and your language can be one of them. By adding your programming language to JDoodle, you can provide a platform for others to explore, use, and give feedback on your creation. If you don’t wish to create a language, come to our platform to try any one of the 88 languages we offer.
Whether you’re building a new programming language or exploring existing ones, the journey of discovery and innovation in the programming world is limitless. Your next big idea could be the next big thing in the programming world.
Frequently asked questions about building your programming language
How to create a programming language in Python
Creating a programming language in Python involves defining its syntax and semantics and implementing a lexer, parser, and interpreter. Tools like ANTLR can help generate a parser in Python, which you can then extend to build your language.
Can I create my own programming language?
Yes, you can create your own programming language by understanding the basics of language design, such as syntax, semantics, and grammar, and by using tools like Python to implement your language.
How do you create a programming code?
Creating programming code involves writing instructions in a programming language that a computer can execute. This typically includes defining variables, functions, control structures (like loops and conditionals), and other constructs specific to the chosen language.
How to create your own program?
To create your own program, you need to decide on the program’s purpose, choose an appropriate programming language, write the code, test and debug it, and finally, deploy or run the program to see if it meets the intended functionality.
What are the 4 types of programming language?
The four main types of programming languages are procedural, object-oriented, functional, and scripting languages. Each type has syntax and use cases, such as C for procedural, Java for object-oriented, Haskell for functional, and Python for scripting.